Scala Made Simple For Beginners

Yadu Krishnan
9 October 2023
This blog is a beginner-friendly guide to kickstart your Scala programming journey, and it even covers how to incorporate external libraries. If you’re relatively new to Scala, I hope you’ll find this information helpful. I won’t be walking you through the basics of Scala in this guide, as there are numerous other tutorials available that thoroughly cover the syntax and fundamental usage of the language.
1. Introduction
When learning a new programming language, one of the major problems I faced was learning about the related ecosystem. Sometimes, it may be easy to write a “Hello World” program, but we might struggle to write a helpful piece of small application, which might need to use libraries.
Until recently, starting with Scala often presented an even steeper learning curve. You needed to set up a full project using SBT, Mill, or any such build tool even to write a small application.
Recently, efforts have been made to simplify the process of starting and writing applications in Scala, particularly for beginners. In this blog, we’ll explore Scala-cli and the Scala toolkit, highlighting how they have significantly facilitated the process of beginning to write Scala programs, especially for newcomers to the language. I’ll also introduce Scastie, using which we can write Scala programs in the browser.
To grasp the fundamental syntax and methods, here are some recommended learning resources. You can also find some beginner-friendly tutorials on my blog as well.
2. Set-Up
This setup step is optional in case of Scala-CLI, as it automatically installs the default JDK. However, you can follow the steps if you want to play around with setup. If not, you may skip to section 3.
Before getting started with using the Scala-cli, let’s first set up the environment. Scala needs JDK to be installed and available. You can install the JDK directly from the Oracle or OpenJDK website. Additionally, you can use the tools like brew, sdkman, apt, and so on depending on the OS.
However, I prefer to use Coursier to manage JDKs as it can used for multiple tools installation related to Scala.
To install coursier, just follow the steps mentioned here. Once the step cs setup is done, the entire environment is ready. It would have installed JDK, Scala-cli, and a few other useful tools. You can see the installed applications using the command:
cs listYou can change the JDK versions with ease using the command:
cs java --jvm 11 --setupInstead of 11, we can provide any other versions. By default coursier set up adoptium JDK. We can specify a different JDK using the command. For example, to install zulu JDK 21, we can use:
cs java --jvm zulu:20 --setupWe can view the supported JDKs using the command:
cs java --availableI have created a cheat sheet of useful coursier commands here.
Please note that we are using the Scala version 3 for the examples here.
3. Scala CLI
Now that we have set up JDK and Scala-CLI, let’s try using it. Let’s create a directory and write our first Scala program using any editor. I placed this file HelloWorld.scala inside the directory scala-cli-demo:
object HelloWorld {
  @main
  def main() = {
    println("Hello, Welcome to Scala! ")
  }
}
The annotation @main in Scala3 lets the compiler know that this is the entry point for the program.
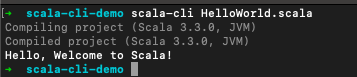
We can compile and run this file by using the command:
scala-cli HelloWorld.scalaIt executes the program and writes the output as shown:
If we want to just compile the file without running it, we can use the command:
scala-cli compile HelloWorld.scalaSo far, we haven’t used any IDE. It is easier to use an IDE that provides auto-complete and other help. We can easily set up the configuration files needed for using an IDE with the command:
scala-cli setup-ide .This creates the necessary configuration files that are needed for the IDE. The popular IDEs for Scala development are IntelliJ IDEA and VSCode(with Metals Plugin). Once loaded, we can run the application directly from the IDE and use all the fancier features that make the coding easier and more fun.
Now, let’s write a bit more complex program that writes some text into a file. We’ll rewrite the contents in our HelloWorld.scala file to handle this.
import scala.io.Source
import java.io.FileWriter
import java.io.File
object HelloWorld {
  @main
  def main() = {
    val msg = "Hello, Welcome to Scala!"
    val fileName = "Message.txt"
    val fileWriter = new FileWriter(new File(fileName))
    fileWriter.write(msg)
    fileWriter.close()
    val src = Source.fromFile(fileName)
    val content = src.getLines().mkString
    src.close()
    println(content)
  }
}
In this file, we are writing a text to a file, reading from that file, and printing it to the console. Here, we used the Java and Scala standard library methods to read and write the file.
Now, let’s try using a nice external library for reading and writing the file. We are going to use the library os-lib for this purpose.
However, we need to provide the maven coordinates of the library for Scala-CLI to download and refer it. We need to use a particular syntax using the keyword //> using dep to inform Scala-CLI:
//> using dep com.lihaoyi::os-lib:0.9.1This informs the compiler to use the dependency with groupId com.lihaoyi, artifactId os-lib, and version 0.9.1. You can also specify a Scala version:
//> using scala 3Let’s rewrite the previous example using this os-lib library. You can refer to the documentation for understanding about various methods provided by this library:
//> using dep com.lihaoyi::os-lib:0.9.1
object HelloWorld {
  @main
  def main() = {
    val msg = "Hello, Welcome to Scala!"
    val fileName = "Message.txt"
    val wd = os.pwd //base directory setup
    val filePath = wd / fileName
    os.remove(filePath) //remove previously created file
    os.write(filePath, msg)
    val content = os.read(filePath)
    println(content)
  }
}
TIP: While using VSCode with Metals, if the autocomplete is not working in this step, you can use the “Clean and restart build server” button from the Metals action in the IDE to force recompilation and indexing. If that doesn’t work, you can safely delete all the hidden directories in the location and restart IDE. This is only needed as a last resort.
Now, we can expand the program to read content from a web URL and write it into the file instead of a hardcoded text. For reading content from a web URL, we are going to use the library sttp-client. We can add the using directive with the sttp-client library version in our code:
//> using dep com.softwaremill.sttp.client4::core:4.0.0-M5Instead of the hardcoded content, we’ll download a markdown file from one of my GitHub repos. Let’s use the sttp client library, download the content, and write to the file:
//> using dep com.lihaoyi::os-lib:0.9.1
//> using dep com.softwaremill.sttp.client4::core:4.0.0-M5
object HelloWorld {
  @main
  def main() = {
    val url = uri"https://raw.githubusercontent.com/yadavan88/blog-code-samples/main/README.md"
    val msg = quickRequest.get(url).send().body
    val fileName = "Message.txt"
    val wd = os.pwd //base directory setup
    val filePath = wd / fileName
    os.remove(filePath) //remove previously created file
    os.write(filePath, msg)
    val content = os.read(filePath)
    println(content)
  }
}
Here we used the get method from the sttp library to download the file contents. You may refer to the documentation for finding out other supported methods from this library. Please note that we are using the latest milestone version of sttp available now, and there could be new stable release soon for 4.0.0.
Here is a cheat-sheet of the useful Scala-CLI commands.
4. Scala Toolkit
In the previous section, we used Scala CLI with dependencies included. In many cases, file operations, JSON processing, REST method invocation, etc. are very common requirements in many programs. As a result, a Scala Toolkit is introduced to easily perform many of the previously common operations without needing to add the dependencies. It is built on top of Scala-CLI.
The Scala toolkit includes libraries to perform the following operations:
- File Operations using OS-Lib
- JSON Processing using uPickle
- REST invocations using sttp-client
- Unit tests using MUnit.
These libraries are included in the Toolkit by default. We can re-write the previous Scala-CLI program using the toolkit. We’ll also add the step to perform additional json processing:
//> using scala 3
//> using toolkit latest
import sttp.client4.quick.*
import upickle.*
import upickle.default.*
object HelloWorld {
  @main
  def main() = {
    val url = uri"https://raw.githubusercontent.com/yadavan88/blog-code-samples/main/countries.json"
    val msg = quickRequest.get(url).send().body
    val fileName = "Message.txt"
    val wd = os.pwd //base directory setup
    val filePath = wd / fileName
    os.remove(filePath) //remove previously created file
    os.write(filePath, msg)
    val content = os.read(filePath)
    val countries = upickle.default.read[List[Country]](content)
    val languages = countries.flatMap(_.languages)
    println(languages)
    println("Using toolkit")
  }
}

case class Country(name: String, code: String, capital: String, languages: List[String])
object Country {
  implicit val rw: ReadWriter[Country] = macroRW
}
Here note that we haven’t given the explicit dependencies for uPickle, sttp or OS-Lib. Instead, we have defined the special declaration of toolkit as:
//> using toolkit latestThis downloads the linked versions of all those libraries automatically. Instead of the version as “latest”, we can also give a specific version(for example: 0.2.0 as of now).
This way it is very easy to set up a Scala application with ease.
5. Scastie
In the previous sections, we setup the local machine with Scala environment. It would be even easier if we can do all these without any setup.
It is possible using the amazing Scastie, where we can write Scala applications in browser, without any local setup.
We can do the same toolkit application we wrote above in the Scastie. For that, let’s follow the steps:
- Navigate to https://scastie.scala-lang.org/
- Enable/disable “Worksheet”. If we are having a main method, then Worksheet mode should be disabled.
- Click on “Build Settings”, select Scala version (I am using 3.3.1 in this case)
- In the “libraries”, search for toolkit. Select the “toolkit” with Scala icon (You may find one more toolkit with typelevel icon. That is for typelevel based libraries).
- Switch back to the editor view by clicking on “Editor” button on top left.
- Now, paste the previous program. No need of lines where we set scala version or dependencies (i.e. without //> lines)
- That’s it, now we can click on the “Run” button and it will work!
Here is the link to the scastie application I created. You can try running from this link or make changes to this and run your version of code.
So easy to make applications and share with others!
6. Conclusion
In this blog, we looked at some of the ways to get started with Scala programming and write a not-so-trivial application with ease. We looked at Scala-CLI, Scala Toolkit, and Scastie. The world of Scala development has never been easier, thanks to these tools.
I hope that this will simplify the process of getting into Scala programming for the newbies.
Check out Yadu’s website to keep up with his latest content: https://yadukrishnan.live/